Showing posts with label Crafting. Show all posts

Friday, March 8, 2013

DIY Valences


I've been trying to find some way to decorate this awkward wall. I love all of the extra natural light from the windows, but with our TV smack-dab in the middle there's not much room to do .... anything. The windows are so narrow, a curtain didn't really make sense, so I decided to do some sort of valence. The more I looked into what exactly I needed, I discovered this is technically called a "cornice". I was able to make two of these for about $20!  I am so happy with how they turned out. Here's how you can make them too:

Supplies for 2 valences:
Foam board - Hobby Lobby on sale for $4
Batting - twin size, used a coupon and got it for $6, but only used about half of it. 
Fabric - heavy cotton, on sale for $6 a yard, I used 1 1/2 yards (46 inches x 45 inches to be exact), but my windows are more narrow than standard windows, so get 2 yards at 45" wide. 
Scissors
Exacto Knife
Staple Gun
Hot Glue Gun
4 "L Brackets" - Lowe's, $1.76 for four including the screws.
Measuring Tape
Pencil


I took my large foam board, and traced the measurements I needed before cutting, to make sure it'll all work. I used my Exacto Knife to make a nice straight cut. 
2 - 13" x 33"
2 - 2" x 33"
4 - 2" x 13"
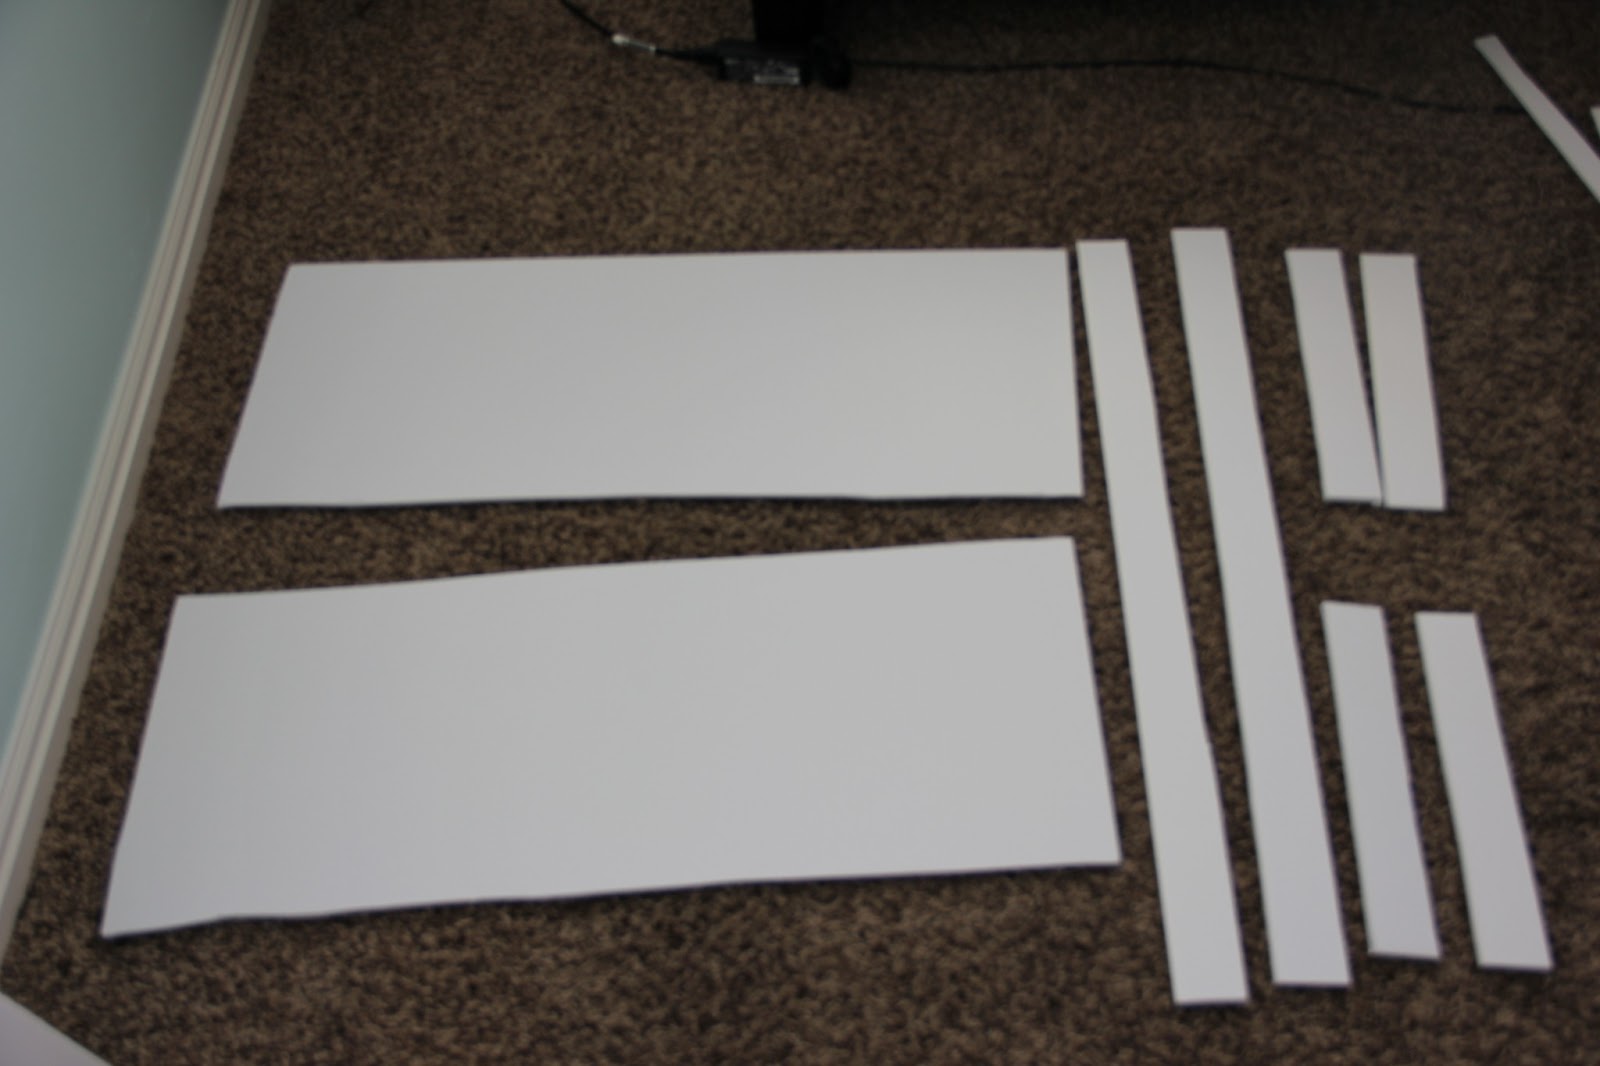

I then used my hot glue gun to take the two 2 x 13 pieces and glued perpendicular on each short end. Then took the 2 x 33 piece and glued all along the top to make it hold in place. Here is my foundation:


I cut a piece of batting (doubled) with the measurements of 23" x 45", giving me extra space on all side to fold it over and staple it tight. I lad the batting down, then the foam board foundation on it's back on top of the batting.

 I cut each end as pictured below, so I could fold over the bottom portion:


Then I folded over the bottom, and stapled in place about every 1.5" or so. 


Then I did the same thing with each side. Cut the batting so you are able to fold over the side. I trimmed off a lot of the excess batting in the corner. Then pull tightly over the side and staple about every inch. Continue with the other sides until the batting is completely stapled on and tight. Cut off any excess. 


I have been looking for a cute print for months, which is why I kept putting this project. But I just couldn't find anything I liked, so I just went with a solid gray cotton. Since my windows are only 29" wide with an extra inch on each side, plus wrapped the fabric around the side piece, 45" wide fabric was perfect for the length. Then for the width I did 23", even though it was only 13" tall, plus wrapping around the top piece, plus a little extra I went with 23". So the fabric (and the batting were 45" x 23"). Make sure to iron your fabric before you staple it on. Do the exact same steps are you did with the batting. 


When doing the corners, I pull in one side, and staple. Then fold over the perpendicular side to make a clean looking corner (this may take some practice before you actually staple down). 


My valences were done, and ready to hang up! So I measured out where my L brackets were going to go. I did 1.5" out of each side from the, and 4.5" above the window. Then, since the valence was so light I was able to just rest it on top of the brackets. 


Ta-da!!


I might add some sort of stripe, or white border. But for now I'm loving having a little something to make the wall not seem to bare! 


Monday, March 4, 2013

Spring Wreath

It's March, and my front door still had my big red wreath from Christmas, needless to say our Christmas lights are still up too, but it's still freezing outside!! But I was in major need of some bright happy colors on my front door. So I went to JoAnn's, and was able to get the wreath and some flowers for under $15. 

I already had some wire and a hot glue gun. I thought I was going to use the burlap to do a bow, so it was here in the beginning, but didn't look right so I did without.  Here are my supplies.


I clipped all of the stems off of the flowers. So they were ready to be put right on the wreath. 


Then I just laid everything on top of the wreath to get an idea of how I wanted it to look in the end.  


I started with the yellow and tied each piece on with some wire. I tied each piece on twice, once at each end, to make sure it doesn't shift being on an outside door. 


Then I tied on the green flowers, and left room for the white flower right on top in the middle. I then took my hot glue gun and went around and tacked on the flowers so they will stay in place. Then, voila! All done. Hung in it up, and it makes me so happy every time I drive in and see it. Bring it one SPRING!!!


Sunday, September 23, 2012

All in a Name

I'm in the process of finishing my daughters room, and she needed a nice personal touch. So I bought some cardboard letters, paint and paper from Joann's. I painted the sides of the letters. Traced the letters on some paper, cut them out and glued them right on. It was quick easy, cheap, and is just what I need to finish the room. Pictures of the whole room to come!


Sunday, February 12, 2012

Heart Garland

I have been feeling like my home needed a bit of love in lieu of the holiday this week. So I took some old red felt, and made a fun little heart garland. Felt, string, scissors and a glue gun.
Double up the felt so that you have 2 hearts exactly the same size. Cut out the hearts, any size that you wish. They could all be the same size, or alternate sizes, or make it random. 
Take one heart and place it under the string. Tack on some glue, and put the other heart on top with the string in between. 
Spread them out as you wish, far apart or touching. Hang it up and enjoy! Quick, easy, cut and festive. 

Tuesday, February 7, 2012

Hair Clippies

My daughters hair is getting long enough in front that it keeps falling into her eyes. I don't want to cut her hair and make her keep the bangs, so I'm trying to let it all grow out with the rest of her hair. But in the meantime, we'll be needing lots of good clippies to keep that hair back. Here's what I've come up with so far:

Take your average little metal clip. Cut out two pieces of felt just big enough to cover the top-bigger part of the clip. Put hot glue on one side of the felt, put it in the clip, with the glue facing up (towards the bigger side of the clip), put the other piece of felt over it and press them together.  

I cut out 4 pieces of felt for my flower. They gradually decrease in size. I gave one piece a few more petals for some added dimension. 
Stack one on top of the other, while gluing them together inbetween with a hot glue gun.  
I then glued on your clip with the felt on it. For a bit of added security I added another piece of felt that is glued onto the clip and to the flower to help keep it in place.
As you can see in this picture, I also took a sewing needle and hand-stitched around the edge to secure the pieces of felt a little bit better.  
Tacked on a few little pearly beads, and "Ta-da!" 
My little girl is obsessed with goldfish (well she loves to eat the goldfish crackers). So I decided to make her a little goldfish clippie! The trick will be to put it in her hair before she sees it so she won't eat it!!

Friday, September 23, 2011

Quiet Book: Reveal

It was my goal to finish this book by my daughters first birthday, and I finished with 2 weeks to spare! I spent under $25 for all of the supplies, and more than 25 hours making it. I am excited to have this for all of my children (it better last that long!). I decided to name it 'Our' Quiet Book, so when there are multiple children trying to play with it, the word 'My' won't be part of it.
Everything is cut out by hand, then glued or sewn together. It's all made out of a heavy felt (cheap and soft). 
Red: You have to collect all of the apples and place them in the basket.  
The pages are made from a durable apparel cotton-weight fabric. Then there is a layer of interfacing to make the pages a bit more durable. Then there is also a layer of quilt batting to make the pages a big more cushy. They ended up being thicker than I wanted, but it works!
Orange: The fishes snap on and off.  
To do all of the words, I used Microsoft Word, found fonts I liked, then printed it out. Cut the words out by hand, then slowly traced them onto to felt and cut them out from there. It was tedious, but so worth it!
Yellow: The flowers button on and off. 
To finished the edges of the pages I just used store-bought bias tape.
Green: The tent zips open and shut. The fire also Velcros on and off.  
The biggest help in making this book was actual Felt Glue. It doesn't seep through the felt, it doesn't make the felt super hard after it dries, you can't see the glue through it, and it works like a charm!
Blue: Learn to lace up a shoe, and practicing tying a bow/knot. 
The thing that took the longest while making this book, was finishing every single piece that wasn't glued to the page (ie., all of these grapes, the fishes, the cupcakes, etc.). The felt would pull and fray if you don't finish the edge. 
Purple: The grapes Velcro on and off. 
One thing that helps make this book more neat, is doing two layers for the pieces that have Velcro or a snap on the back. It looks tacky if you can see the stitching for something like that. 
Pink: The cupcake tops snap on and off.  
A project like this may take a long time, but by breaking the tasks up into pages you still feel like you're accomplishing something. I always tried to work on one little thing while we were watching a TV show or a movie so that I felt like I was taking advantage of the time I had just sitting there. With something like this that you're going to have for your family for a long time, it's OK to take a long time making it!
Black: Play tic-tac-toe!  The X's and O'x Velcro on and off. 
To attach the pages, I decided just to do button holes, then slip in a 3 inch metal ring to keep them all in place. That way if one of the books gets damaged I can simply take it off and fix it or replace it. I can also add pages this way! I'm excited to actually put this to use!
White: The snowman's hat Velcro's on and off, and his body buttons on and off.